Showing posts with label DIY. Show all posts

28 December 2012

DIY: Spray Painted Wire Rack

Do you like free stuff?  I do... a lot. My ears perk up automatically as soon as I hear "Does anybody want this desk/chair/candy/shirt/hat/pencil/cookie/dirty wire rack?" And just like that my hand shoots up and a subtle, yet firm "Me!" escapes my lips before my brain even knows what's happening. I figure I'll accept now and decide what to do with it later.

Case in point: Chipped wire rack, covered in garage grime - layers of dusty filth, cobwebs, dead bugs and leaves.

"ME! I want.  It's mine, give it here.  I'll take it, just need to make space in the car. GIVE IT. MINE. Thank you."

DIY Neon Spray Painted Rack by OTL blog

This little rack needed some punch and bright furniture has been all over my Pinterest boards, so it was a pretty obvious and simple idea. I love the outcome, plus it cost under $12.  And now my plants have a pretty place to bloom (AND NOT DIE PLEASE) in my little apt.

How to Spray Paint a Metal Rack
Skill level: Crazy Easy
  1. Acquire said piece and clean thoroughly with soapy water. Dry completely.
  2. If your item is a dark color - anything other than white probably - prime it or fill in any chipped or dark sports with a paint or spray-on primer. This might take 2-3 coats.
  3. Allow primer to set according to instructions. Then, with a color of your choosing, spray paint the hell out of it. (Ideally on a large tarp, away from anything you don't want to get ... colorful.) Painting wire is kind of a drag, as most of the surfaces difficult to see/reach and you will feel like a lot of paint is being wasted  floating off into the air. Keep going, persistence and a strong trigger finger are key. And rotate that thing, make sure you get it from all angles.
  4. Let dry, place some chachskies on it and be done!

How do you guys get down with spray paint?  It's so versatile and the color selection is pretty amazing, right?!


17 April 2012

Decorate Your Space // DIY Paper Pennant


Life in my new apartment is finally running smoothly with all of the needed (read: boring) items purchased: Light bulbs, cleaning stuffs, paper towels, utensils, etc.  Now, it's time to get a jump on the FUN decorations and cheer up the place!  I'm only planning on staying in this space for the next year, so easy-to-make decorations that are inexpensive, that can be moved easily and that don't require much planning are key.  And since I always want my life to feel like a good party, I decided that stringing up a few garlands would be the way to get it did.

This paper, pennant garland was SO easy to make and I tacked it up with just a bit of tape and I was good to go!  Plus, you gotta admit, it looks like a giant, toothy grin and how can that not put a smile on your lovely face?

You will need:
  • Colored card stock or construction paper
  • Glue (Tacky or wood)
  • A pencil
  • Scissors or an exacto knife
  • String (I used a neon pink shoelace) 
  • Ruler
(Neatly assemble your supplies.)


(Measure out an isosceles or equilateral triangle on a piece of paper and cut it out.  Use that as a template to trace out 10-15 triangles on the rest of your paper.  Then, cut them bad boys out.)

(Squeeze out a bead of glue at the top of your triangles and stick them onto the string.  Use your ruler to space them equally - mine are 2 inches apart.  Both tacky glue and wood glue dry super fast, which means your triangles shouldn't fall off when you try to hang this without letting the glue dry completely. #impatient)

(Hang, admire and SMILE.)

12 April 2012

The Daily Draw // Logo and Package Design

[A peak at what I'm drawing today...]


Feast your eyes on round one of prototype packaging for onthelookout jewelry.  I think I've decided to do a combination business card / earring, necklace and bracelet holder - in order to keep my costs down and streamline the process.  When you're starting your own creative business and, hence, do all of the work, you gotta take the "easy" route when you can.

So far, my idea is to use rectangular piece card stock.  I'll then stamp my logo in black/gold/pink at the top and a row of three or five chevron/herringbone/triangles at the bottom in another color.  I figure I'll go ahead and hand cut slits or holes in the card stock with an exacto knife, depending on what it's going to hold.  After that, I need to decide if those go into boxes or muslin jewelry bags.  I'm leaning towards boxes, because there's built in protection for shipping right there, but those little bags are so cute!

Looks real amateur, doesn't it?  Just how I like it... Simple beginnings soon lead to great things, I think.

And by great things, I mean I want to be starring into the likes of one of these bad boys one day:

11 April 2012

Collection: Wood You Rather?

[...a collection of wooden finds.  And a terrible, nonsensical pun, but yeah, I went there.]

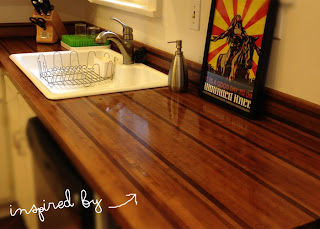
alicia's amazing wooden counter top

As soon as I saw Alicia's pictures from her kitchen renovation, I instantly fell in love with their expansive, butcher-block counter. Dang, it looks so warm and pretty!

That got me thinking about one of my favorite materials to work with: wood.  Wood, people.  With all of its antiquated charm, wonderful scents, general abundance and raw unwillingness to be anything other than what it is -- Ever try to stain something exactly the color you want it, to only get a better (or worse) turn out?  You know what I mean.  

So, I put together a few of my favorite wooden finds right here for you!


one - Handcrafted, reclaimed wood headboard by Ariele Alasko, recently featured on The Makers Project.
two - Hand carved, oak rope swing.
three - DIY painted wooden platter.
four - Pretty, painted wooden bowl set.
five - Wooden handled bread spoons (Each spoon measures out the exact amount of each ingredient to make homemade bread.  Awesome.)
six - A handy guide for the practical folks.
seven - Mora tree branch wooden sling shot (I may or may not have climbed trees in my youth and shot acorns and rocks out of a device such as this. #dennisthemenacewannabe)
eight - Handcrafted, natural wood chest.
nine - Wooden nugget necklace.
ten - The stacked wedges of my dreams.

(Someday, I will have a wood shop in my studio/home - right across from the metal fabrication area and laser cutter.  And I'll play with the likes of power tools and hammers, tool belt slug around my waist and nails in hangin' out of my mouth.  I'll bang around, measure twice, cut once, get lots of splinters and rescue wooden pieces and parts to turn what was once waterlogged and damp/ dry and brittle/ trashed and forgotten into pretty pieces to be loved again.  #dreamvivid)

29 November 2011

Biznass - Packaging

Now that I've got a nice assortment of goodies AVAILABLE FOR SALE in the shop, I'm turning my focus back to better branding and something most important: the packaging.  I'm a sucker for unique, fun, reusable packaging stuffs, so I'm excited to pull together all of the resources I already have (random stacks of card stock, newsprint, pretty ribbon and string) and mix with some much needed branding accessories (rubber stamps with logo, stickers for packing and little cards for securing earrings, bracelets and necklaces).

I've compiled some my favorite hang tags and wrapping ideas below and if you're looking to create unique packaging for your own creative business, this handy article by Rena Tom is on the money.


image via A Merry Mishap.


Glasine bags, stickers, twist ties, string and other pretty packaging items from Pretty Tape.


the cutest little bags from Deer in a Bottle and via The New Domestic.

no frills, cute/pretty packaging DIY using the most basic of household stuff.


23 August 2011

DIY Table/Desk


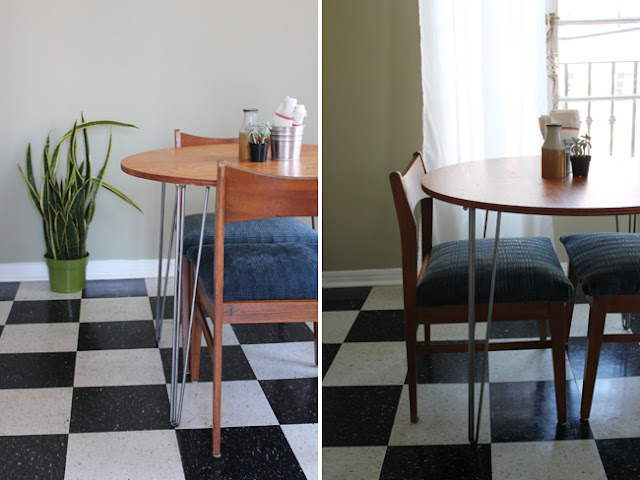
Desk and table by Kate

Work in progress by Silvia.

In the mood to make some more table space in your kitchen/dining room/bedroom/studio? Well, look no further, as the blogging deities have bestowed upon us the perfect inspiration to get the job done on the cheap...money-wise and time-wise.  Like what you see, people? (Honestly, how can you not..) Take a look at the how-to and more images of Kate's first and second version and the final, pretty and perfect results of Silvia's cute coffee table.

The company that fabricates these awesome hairpin legs is in MY neck of the woods, give or take a couple of hours.  So, as I feel it is my duty to support local businesses, it only seems right that I get working on this ASAP and order them legs!  I'm thinking something along the lines of an L-shape, for more surface area.  Details to come...